
Pull-it Together Drawstring Pouch- Free Crochet Pattern
The Pull-it Together Drawstring Pouch is perfect for keeping your make-up and other small items in one place. This crochet drawstring pouch is created shallow and opens wide, to allow easy access to your items.
This pattern has a few different stitches, single, double and front post. It’s an advanced- beginner pattern but it can be easily worked. When finished you should have a nice crochet make-up pouch.

This project was sponsored by Furls Crochet as part of Furls Crochet Blog Hop for 2021. Yarn and hook were provided for the design. The post contains affiliate links, and is at no additional cost to you, please see my disclosure for full details.
During the blog hop, you’ll get a new free pattern every week! You can see all of the past weeks, and see new patterns as they are added, by visiting Furl Crochet.
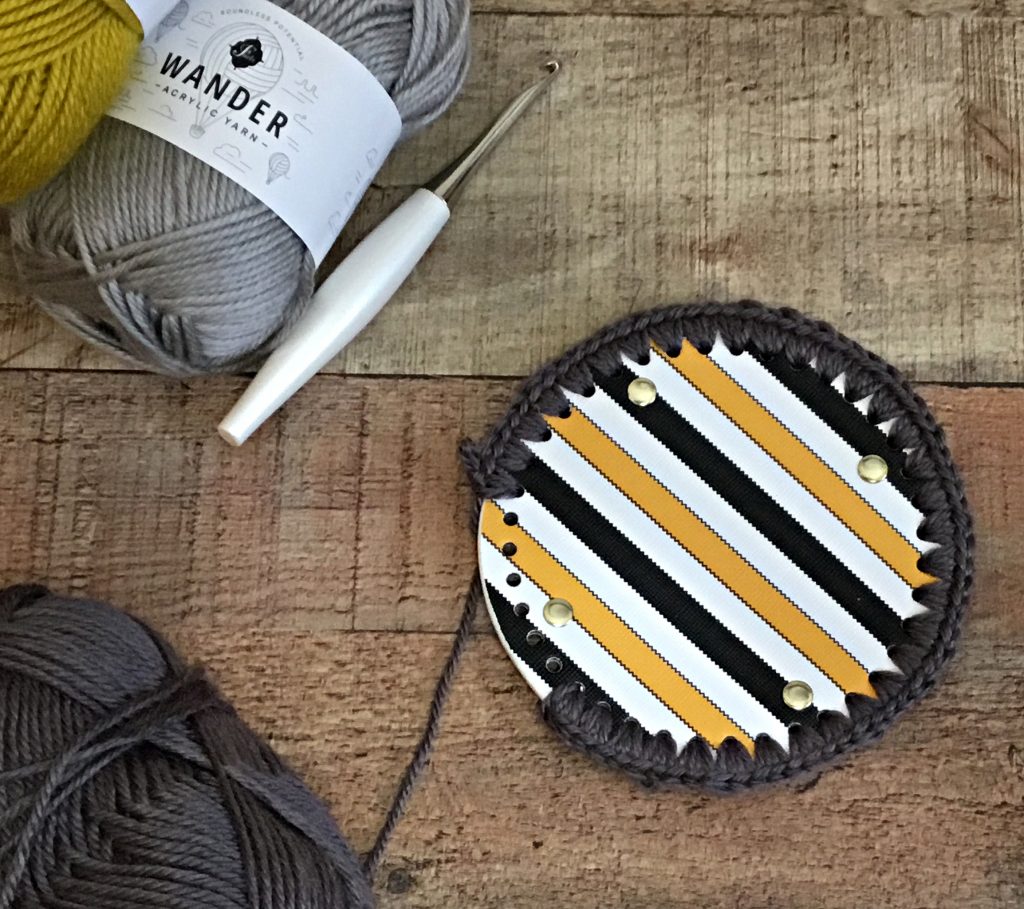
YARN
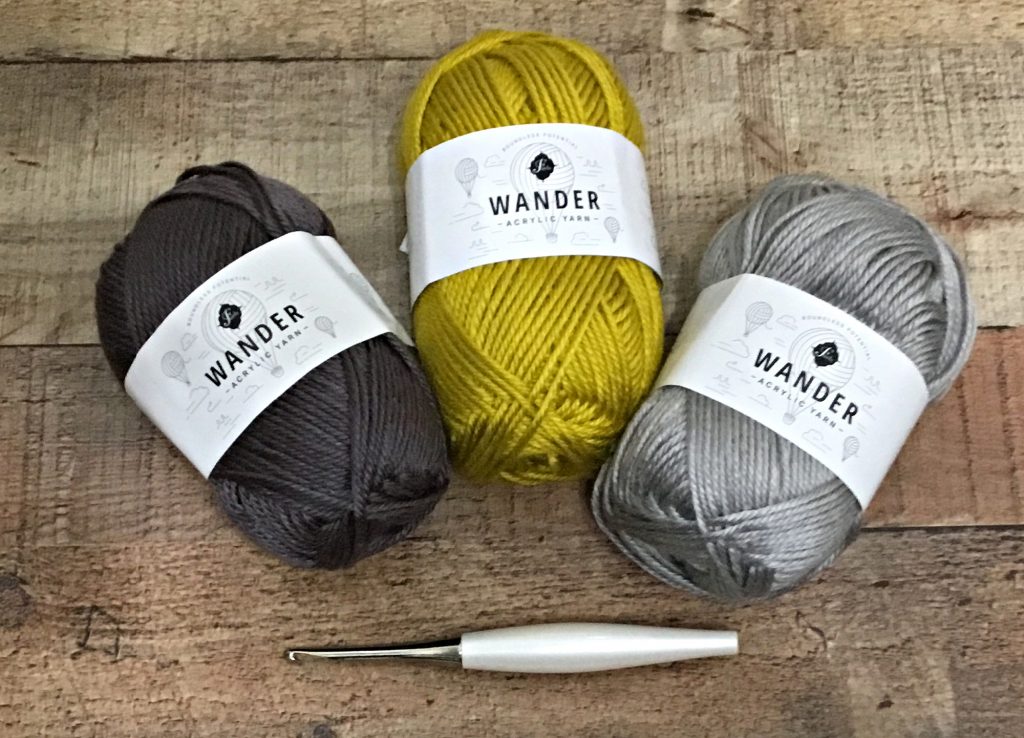
I use a worsted weight yarn, Wander, from Furl Crochet. This is 100% Acrylic, 4 that is, 120 yards, per skein (Colorway-Cobblestone, Mist, and Canary).
I loved the light sheen that this yarn has. It is soft to the touch and easy to work with. there are 14 beautiful, bright colors. Which makes it perfect for many different crochet projects. But don’t just take my word for it.
Click here or on the image below to see all the wonderful colorways that Furls has to offer!
![]()
You’ll need 3 skeins of yarn, Approx. 360 yards. To make this Pull-it Together Drawstring Pouch.
SUPPLIES
Yarn
Wander in Cobblestone, Mist, and Canary (1 skein of each color) 360 yards
Hook
Crochet Hook 3.75mm- Furl Odyssey
Notions
Yarn Needle
Scissors
Stitch Markers (Optional)
Crochet Bottom Shaper 14cm/5.5 inches -40 holes
Lucet Fork- Furl (Optional)
For an Ad-Free PDF Version of this Pattern Click Here

PATTERN DETAILS
Skill Level
This is a project for the advanced beginner. If you are new to crocheting you need to be comfortable completing single crochet, double crochet stitch, and an Alpine Stitch (Similar to a front post stitch).
Note: This pattern is written in U.S. terms and there is a key provided, to help with any abbreviations. Also, there have been Notes placed throughout the pattern to provide additional help. There are a few pictures and instructional videos, that have tips on the different stitches used, The videos can be found on my YouTube -AhselAnne.
Gauge
The gauge may vary based on your crochet style. If you don’t use a crochet bottom, create your circle to reach 5.5” diameter.
Finished Measurement
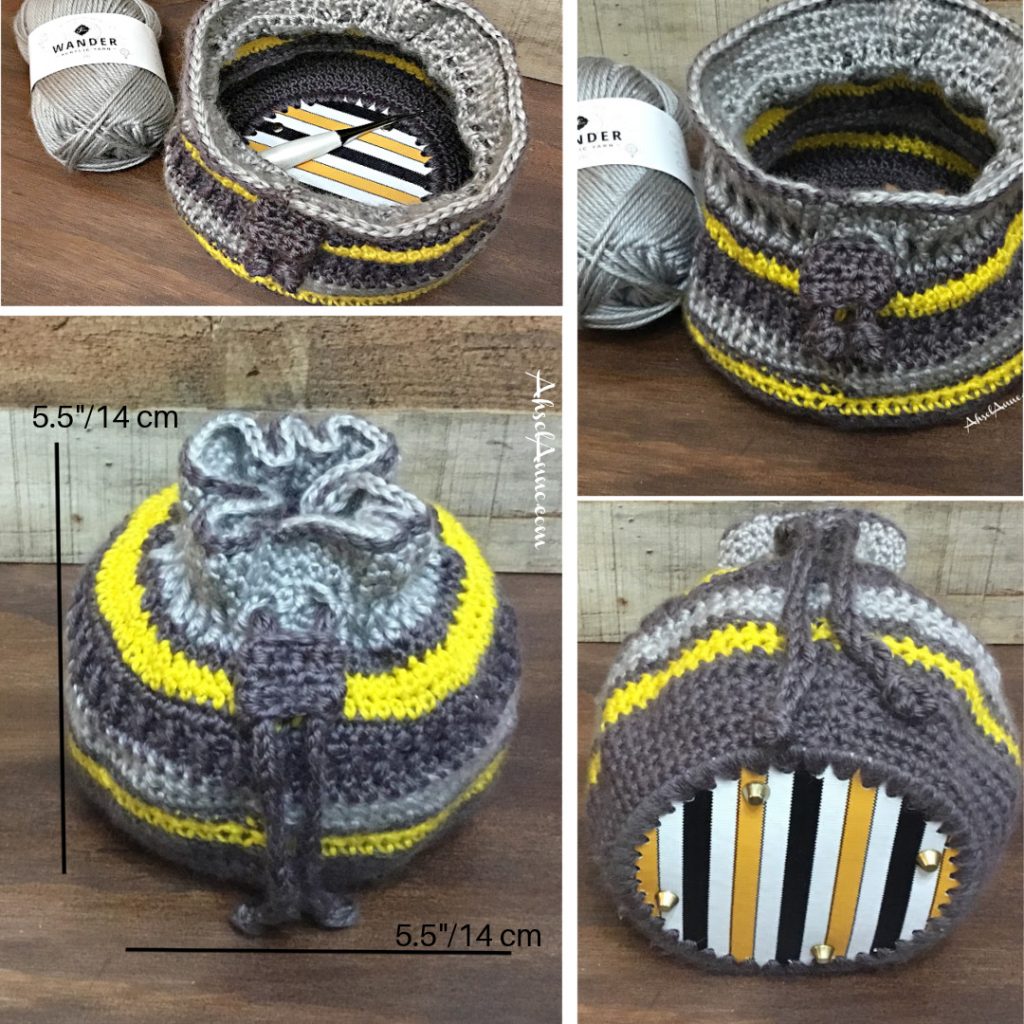
Diameter 5.5”
Height 7”

Abbreviations (US Terms)
ch- chain
dc- double crochet
esc- extended single crochet
fpdc- front post double crochet
sc- single crochet
st(s)- stitches
sp- space
sl st- slip stitch
tw- turn work
yo- yarn over


Notes
Special Stitches
The Alpine stitch is used in this pouch. This stitch is created by using a Front Post Double Crochet (fpdc).
Master the Alpine Stitch? Try this project next:
Extended Single Crochet– Insert hook from front to back through the stitch to be worked. Yarn over (yo) pull the hook through stitch, yo, and draw through the first loop only, leaving 2 loops on the crochet hook. Yo and draw through both loops on hook.
Front Post Double Crochet (fpdc) – Yarn over (yo) and insert your hook, between the posts of the first and second double crochet of the row below. The post should be pushed forward and the hook should be positioned horizontally behind the double crochet.
* The below image is taken from another one of my crochet projects, but it is used here to illustrate an fpdc.
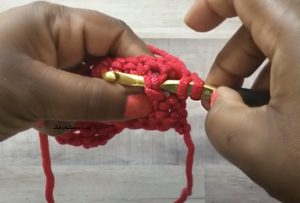
Yo and draw the yarn back through. You now have 3 loops on the hook. Pull up so that the stitch is the same height as the ch 3. yo and draw the yarn through the 2 loops on the hook, twice (completing a double crochet stitch).
Written Pattern for Pull-it Together Drawstring Pouch
Using the crochet bottom shaper will allow the pouch to have a solid bottom, which makes it perfect for holding make-up items and other smaller items. The bottom I used was purchased from Amazon. Check the link to see if you can find the same one or something similar. I used a 14cm shaper with 40 holes.

Color A – Cobblestone
R1: Attach yarn to the crochet bottom shaper
and place 2 sl st into each hole around (80). Sl st to join the round, ch 2. (This ch 2 will count as the first stitch of the next round.
R2: 1 esc into each stitch around (80), sl st to join round;
ch 2.
R3: 1 esc into each stitch around (80), sl st to join round; ch 2.
R4: 1 esc into each stitch around (80), sl st to join round;
ch 2.
R5: 1 esc into each stitch around (80), sl st to join round;
ch 2.

Change Color C- Canary
R6: 1 esc into each stitch around (80), sl st to join round;
ch 2.
R7: 1 esc into each stitch around (80), sl st to join round;
ch 2.
Change Color A- Cobblestone
R8: 1 esc into each stitch around (80), sl st to join round;
ch 2.
Change Color B- Mist
R9: esc into each stitch around (80), sl st to join round;
ch 2.
R10: esc into each stitch around (80), sl st to join.
PATTERN CHANGE
Change Color A- Cobblestone
R11: Ch 3, dc into each stitch around (80), sl st to join round; ch 2.
R12: sc into each stitch around (80), sl st to join; ch 3
Alpine Stitch
Note: Turn the pouch, to work the Alpine Stitch on the outer side of the bag, this is the side that will be seen. This step is important if you are using a bottom form, that has feet. You will not be able to flip the bag inside out because the feet will be on the inside of the bag.
Be sure to work the Alpine stitch so that it is on the outside of your pouch.
R13: The chain 3 will count as the first stitch, fpdc, dc, fpdc (repeat this pattern) *front post double crochet, double crochet, front post double crochet), around.
Note: The fpdc will be worked behind the dc post from R11, the dc will be worked through the sc stitch, from R12
R14: sc into each stitch around (80), sl st to join. Ch 2
Change Color C-Canary
R15: esc into each stitch around (80), sl st to join round, ch 2.
R16: esc into each stitch around (80), sl st to join round, ch 2.
Color A – Cobblestone
R17: esc into each stitch around (80), sl st to join round.
Color B- Mist
R18: Ch 3, dc into each stitch around (80), sl st to join round ch 2.
R19: sc into each stitch around (80), sl st to join. Ch 3
Alpine Stitch
R20: The chain 3 will count as the first stitch, fpdc, dc, fpdc (repeat this pattern) *front post double crochet, double crochet, front post double crochet), around.
R21: sc into each stitch around (80), sl st to join.
R22: esc into each stitch around (80), sl st to join round,
ch 2.
R23: esc into each stitch around (80), sl st to join round,
ch 2.
R24: esc into each stitch around (80), sl st to join round,
ch 1.
Color A – Cobblestone
R25: Sl St each stitch around, this is the last round (80). (This is the finishing round and it’s designed to add a completed look to the pouch).
This step is optional, as it only adds style and not any height to the pouch.
Fasten off and weave in all ends.
Any long tails, used while changing yarn color, weave those ends into the inside of the pouch, secure, and then cut.
Creating the Cord
Color A- Cobblestone
The Lucet Fork from Furl Crochet is so beautiful and a little hard to get my hands on. The vintage design and detail-oriented craftsmanship are just as gorgeous, which is probably why this item is still on my wish list.
Nevertheless, if you can get your hands on one I’m sure it will be a great addition to your crochet tools.

Chain stitch a cord or use the Lucet Fork (This is a version I found and use from Amazon, it is definitely not a show-stopper but it gets the job done) to create a cord that is 49”.
For a tutorial on how to use a Lucet Fork, CLICK HERE or visit AhselAnne on Youtube.
Thread the cord through R20, the Alpine Stitch row, to finish the drawstring pouch.

Optional
A latch for the drawstrings to pull through was created for
added embellishment.
Ch 12
R1 sc, ch 1 tw.
R2 sc
Fasten off
Fold in half and wrap around drawstrings. Sew down the center to ensure cords fit neatly.

NOTES:
While the crochet bottom is not needed to complete this project, it helps with the design of the pouch. I purchased my round from Amazon.com but it can also be purchased at a fabric or hobby-type store.
If you do not want to use a crochet bottom, you can find a tutorial on a similar crochet pouch, here. It can help you get started with creating the bottom portion of the pouch.
Once you complete the bottom following along with the pattern. Keep in mind your stitches count will vary.

interesting bag. how do yo attach the yarn to the bottom?
Hello and Thank you. I have a video on my YouTube Page Ahselanne and also you can see it under the Post Catch The Fall Purse, here on my website, where I show how to connect the yarn to the bottom.