

Sneak-A-Peek Crochet Booties
I absolutely love Learning, Creating, and Sharing. Check out my Disclosure for the details. Sneak-A-Peek Crochet Booties
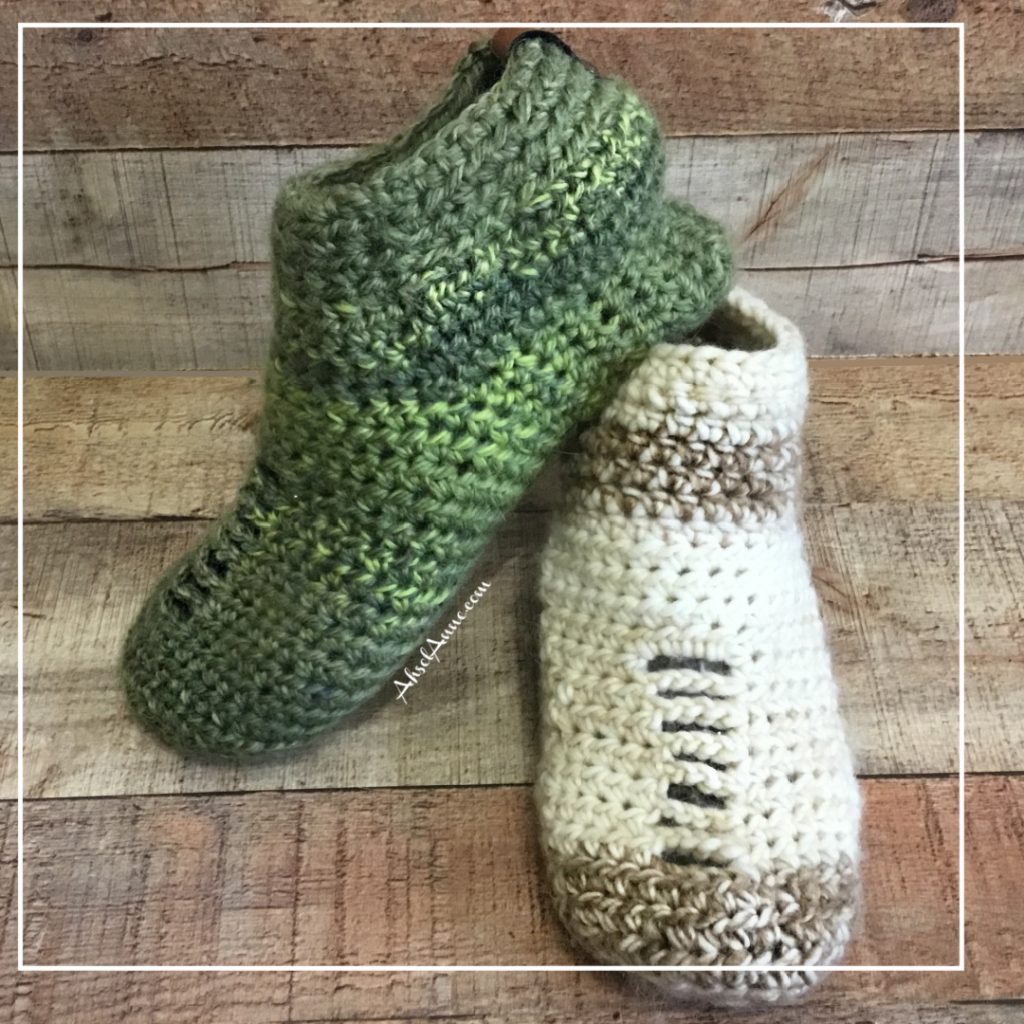
The Sneak-A-Peek Crochet Booties are not only fun to create but they work up quickly. I absolutely love the sneak-a-peek design along the toe area. While this pattern is sized for a women’s 8-9 foot; it can be customized by adjusting the heel area. These cute booties can be perfect for you or a gift for others.

This project was sponsored by WeCrochet as part of Winter Wonders 2021 Blog Hop. Yarn was provided for the design. The post contains affiliate links, and is at no additional cost to you, please see my disclosure for full details.
During the blog hop, you’ll get a new free pattern every day. You can see all of the past weeks, and upcoming patterns by visiting itchinforsomestitchin.com
YARN

Type of Yarn:
Chroma Twist Bulky from KnitPicks/WeCrochet®
Yarn Characteristics:
This is a 70% Superwash Wool, 30% Nylon Yarn, 5 weight, 127 yards/100 grams, per skein.
Colorway:
Leaf
Yarn Needed:
You will need approx. 200 yards or 2 skeins of the Chroma Twist Bulky for this project.
Note:
I really enjoyed using this yarn, it was soft to the touch, with a comfortable thickness. The way this yarn is spun it will have the same flow, but no two skeins are the same. The beauty of Chroma Twist Yarn is it will vary from skein to skein, with that said, the booties will coordinate but they will not be identical. If you want identical booties use a 5-weight yarn that is the same color.
Note: This pattern was created using the Chroma Twist Bulky Yarn from KnitPicks/WeCrochet. It will be important that if you use another yarn you measure (the bridge area, heel area) as your work, to ensure your booties will fit properly. I will make Notes throughout the pattern to help guide you.

The Beige pair of booties socks, seen in this pattern, were created using the Mandala Ombre Yarn from Lion Brand, this is a bulkier 4 weight yarn. If you do not mind the color variation that naturally occurs with this yarn, the Mandala Ombre yarn work well with this project too
For an Ad-Free PDF Version of this Pattern Click Here, Etsy
For an Ad-Free PDF Version of this Pattern Click Here, Raverly

PATTERN DETAILS
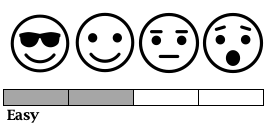
Skill Level
For a better understanding of skill, learning Click Here. You’ll be led to the Craft Yarn Council for a deeper dive into skill levels.
This is a project for the advanced-beginner. If you are new to crocheting you need to be comfortable completing a single crochet, half double crochet stitch and be comfortable working in a round.
Note: This pattern is written in U.S. terms and there is a key provided, to help with any abbreviations. Also, there have been Notes placed throughout the pattern to provide additional help. There are a few pictures and instructional videos, that have tips on the different stitches used, The videos can be found on my YouTube -AhselAnne.
SUPPLIES
Yarn
250 yards of 5 weigh, Yarn- Chroma Bulky Twist –
Colorway – Leaf

Hook
Crochet Hook 5.5mm- Furl Odyssey
Notions
Yarn Needle
Scissors
Stitch Markers
Measuring Tape

PATTERN DETAILS Sneak-A-Peek Crochet Booties
Gauge
10 hdc stitches x 11 rows = 4”
Note: Please measure as you go along, Toe/Bridge area and the Heel Flap area. The booties
will stretch some depending on
your yarn choice.
Finished Measurement
*Note: The booties can be customized

Women size 8-9 (Medium)
8.5”, 7” tall
Women size 10-11 (Large/XL).
9.5”, 7” tall
Keep in mind the type of yarn
matters. Bulky yarn will work
up differently than 4 weight
yarn. Please measure
as your work to ensure
booties will fit properly.
Abbreviations (US Terms)
ch- chain
hdc- half double crochet
sc- single crochet
sk st- skip stitch
st(s)- stitches
sp- space
sl st- slip stitch
tw- turn work
yo- yarn over
R- Round


Written Pattern – Sneak-A-Peek Crochet Booties (Make 2 Booties)
Toe & Bridge (Worked in Rounds)
Magic Circle: Ch 3 (This ch 3 is your first hdc); leave a tail.
R1: Crochet 11 hdc, into the circle (12); sl st to join round; ch 2.

Add another easy crochet project to your list? Try this next:
Increase Round(s)
R2: Ch 2 (the ch 2 will count as hdc), 1hdc, in the same stitch as the ch 2; 2hdc in each stitch around (24); sl st to join.
R3: Ch 2, (the ch 2 will count as hdc); 1 hdc (in the next stitch); 2hdc in next stitch; *[1 hdc in the next stitch, 1 hdc in the next stitch, 2hdc in next stitch]; This is the Pattern
Repeat [*], each stitch around. End with 2hdc in the last stitch around (32); sl st to join.
R4: ch 2, 1 hdc, in each stitch around (32); sl st to join.
R5: ch 2,1 hdc, in each stitch around (32); sl st to join.

PATTERN CHANGE (Creating the Bootie Design/Bridge)
R6: Ch 2 (the ch 2 will count as hdc); 1hdc, 1hdc, 1hdc,
1hdc, 1hdc, sk 4, ch 4, place 1 hdc in each stitch around (28 hdc + the ch 4 space = 32).

R7: Ch 2; 1 hdc, 1 hdc, 1 hdc, 1 hdc, 1hdc, sk 4, ch 4, 1 hdc; repeat 1 hdc in each stitch around (28 hdc+ ch 4 space 32).
R8: Ch 2; 1 hdc, 1 hdc, 1 hdc, 1 hdc, 1hdc, sk 4, ch 4, 1 hdc; repeat 1 hdc in each stitch around (28 hdc+ ch 4 space 32).
R9: Ch 2; 1 hdc, 1 hdc, 1 hdc, 1 hdc, 1hdc, sk 4, ch 4, 1 hdc; repeat 1 hdc in each stitch around (28 hdc+ ch 4 space 32).
R10: Ch 2; 1 hdc, 1 hdc, 1 hdc, 1 hdc, 1hdc, sk 4, ch 4, 1 hdc; repeat 1 hdc in each stitch around (28 hdc+ ch 4 space 32).
R11: Ch 2; 1 hdc, 1 hdc, 1 hdc, 1 hdc, 1hdc, sk 4, ch 4, 1 hdc; repeat 1 hdc in each stitch around (28 hdc+ ch 4 space 32).
R12: Ch 2; 1 hdc, 1 hdc, 1 hdc, 1 hdc, 1hdc, sk 4, ch 4, 1 hdc; repeat 1 hdc in each stitch around (28 hdc+ ch 4 space 32).
PATTERN CHANGE
(If using 4 weight yarn continue working R17-R19)
R13: hdc each stitch around (32); sl st to join round. **Place 4 hdc in the ch 4 space**
R14: ch 2, hdc each stitch around (32), sl st to join round.
R15: ch 2, hdc each stitch around (32), sl st to join round.
R16: ch 2, hdc each stitch around (32), sl st to join round.
Finish off
PAUSE: Check Measurement
Toe/Bridge Area 6.5”/16.5cm
Note: If the sock is for you, try it on at the point. It should reach the top of the bridge area of your foot. Add a row(s) if it does not reach this point.
 Remember this pattern is sized for a woman’s size 8-9, using the Chroma Twist Bulky yarn
Heel Flat – (worked in rows)
*If using 4 weight yarn work to R6 (small), R8 (medium) and R10 (large).
NOTE: If you need to customize your booties, for a larger adult size, this is the place in the pattern where you will make the adjustment.
– Woman size 6-7- Work 4 rows, approximately 1.5”-2”/4cm-5cm.
– Woman size 8-9- Work 6 rows, approximately 2.5”-3”/6.5cm- 7.5cm.
– Woman size 10-11- Work 8 rows, approximately 3 ½”-4”/9cm- 10cm.

Heel Flat – cont. (worked in rows)
– Press your bootie flat.
– The flap area needs to be evenly spaced, at the back area of the bootie.

– Using one of the 2 stitch markers, place a stitch marker at or near the last crochet stitch created. Remember the goal is to create your heel area evenly along the back area of the bootie. You may have to adjust you stitch markers to create uniform spacing.
– Count over from that stitch marker, 16 stitches (along the backside of the bootie). Place the second stitch marker at the 16th stitch.
From stitch marker to stitch marker, this will be the section where the heel flap is created.
Reattach the yarn at the stitch marker; ch 2.
Row 1: hdc each stitch across (16), tw.
Row 2: ch 2, hdc each stitch across (16), tw.
Row 3: ch 2, hdc each stitch across (16), tw.
Row 4: ch 2, hdc each stitch across (16), tw.
Row 5: ch 2, hdc each stitch across (16), tw.
Row 6-8: for Women’s 10-11
Fasten off; leave a long tail (Approx. 15”/38cm).

Construction of Heel
Fold heel flap in half.


Ankle
Reattach the yarn at ankle opening; ch 2.
R1: hdc around the opening (32), sl st to join round, ch 2.
Note: This stitch count around the ankle may vary but aim for 32 stitches around. This way you will not have to decrease later, the goal is for the booties to fit nicely around your ankle.
You want to have the same stitch count around your ankle for both booties.
R2: hdc each stitch around (32) sl st to join round; ch 2.
R3: hdc each stitch around (32) sl st to join round; ch 2.
R4: hdc each stitch around (32) sl st to join round ch 2.
R5: hdc each stitch around (32) sl st to join round ch 1.
R6: sc each stitch around (32) sl st to join round.
R7 (Optional): sl st around (32) sl st to join round. (This round will make the ankle area tighter. Complete this round only if you find your ankle area to be a little too loose.
Note: If you have more stitches around the ankle area (more than 32), then you may have to complete a few decrease rounds, to bring your stitch count down. This will allow the booties to fit snugger around the ankles.
You can decrease in any of the 6 rounds. A couple decreases stitches per round until you get to the desired stitch count (32).
For Example:
If you only have a couple more stitches, for instance, 34 stitches you can complete the optional round 7. This will make the ankle area snugger too.

Finish
– Using the tail from the magic circle, sew the tip of the toe closed.
– Turn the bootie inside out and weave in any tail ends.
– Fasten off and enjoy.


Check out the video for visual instructions. Enjoy your Sneak a Peek Booties.
Hello. Your pattern doesn’t have a round 2 listed. It goes from round 1 to round 3. 🙂
Ut oh, let me go check it out. Thank you 🙏🏽
Hi Tammy, It has been updated. Thanks for that catch.
These slippers are perfect. Thank you for sharing your lovely pattern!
stay safe and happy!!